> For the complete documentation index, see [llms.txt](https://help.accentuate.io/llms.txt). Markdown versions of documentation pages are available by appending `.md` to page URLs; this page is available as [Markdown](https://help.accentuate.io/bulk-import-and-export/metaobject-export-import.md).
# Metaobject export / import
After you have set up your Metaobject definition you will want to fill it with values. Adding instances one by one can be a hassle if you already have a bunch of entries planned out and you just have to insert that data into Shopify. Our import/export feature solves that headache by making bulk editing or adding entries a breeze.
We use the familiar interface of an Excel spreadsheet where you can quickly manage hundreds of instances at once and when you are ready you can just import the sheet and all your data will be transferred to Shopify. Exporting your Metaobject data periodically or before a big change can be a great way to create a backup or a safe point where you can return to if anything goes wrong.
## Exporting values
Exporting your Metaobject instances gives you a great overview of all your data, and can serve as a template for editing and adding new information. To do so click the Export button on the META page. You will be greeted by a modal that asks you to set up some settings of the export:
* Email - here you can input your email address in order to get notified when your export is finished.
* Export only certain definitions - if you don’t want to export all of your Metaobject definition’s data you can choose to export only the data of a single definition. We have a shortcut button for exporting only the data of a single definition on every definition for ease of use.
* Export status only - if you are just trying to manage what gets displayed on your page without messing with any of the data this checkbox allows you to just export the status column of your Metaobjects.
* Filter by status - this option is also great for changing what gets displayed on your storefront. If you have a bunch of Metaobject drafts ready to go this allows you to publish them all at once, or if you are trying to quickly hide a bunch of data this is your friend.
## Data format
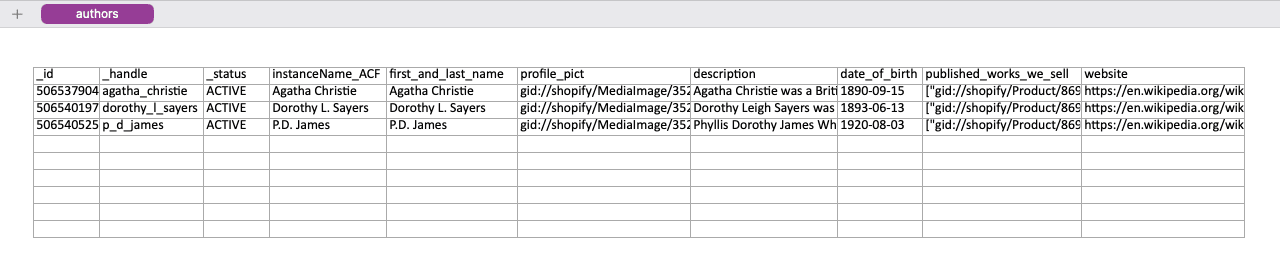
When you export your Metaobject data you will get a sheet looking something like this:
Some important things you should know are:
* The sheet name is the type of the Metaobject. In this example, I exported only one Metaobject definition’s instances. Had I exported multiple definitions they would get their own sheet each. This way the data is neatly organised.
* The rows are instances, the columns are the field definitions of the instance.
* You need all the fields of a Metaobject in order to update it. Currently, we don’t support partial updates of the Metaobject definition. If the file you are importing does not contain all the required fields then the import will not be valid.
## Importing values
After you have edited your spreadsheet it is time to import it back into Shopify.
If you are using the import to create new Metaobject instances you should leave the \_id column empty. This tells us not to search for an existing instance by id, but instead create an entirely new instance.
Importing the spreadsheet will directly affect the values you have set in Shopify.\
\
We have a special setting for only importing the status field in the form of a checkbox on the import modal. Checking this will ignore the values you have on the rest of your columns and only update the status field.
## Errors
If we run into errors while importing your custom data they will be displayed in the status column in the activity log. Clicking on the error text will open up a modal where you can see exactly what the error was and what field and instance it occurred on. This is usually the fault of bad formatting or a typo. Knowing what the error is and on what instance it occurred will allow you to manually update that instance in the editor or if there are too many errors you should modify the file you used for your import and try again.