
AI Assistant for Shopify Custom Fields
The AI Assistant lets you set up and manage custom fields by describing what you need in plain language. You don’t have to choose field types, keys and validation rules one by one. Just say something like “Add a care instructions field for my clothing” and the assistant shows you exactly what it would create or change.
Nothing changes in your store until you approve it. Every change takes two steps. First you review it and click Confirm, which adds it to your list as an unsaved change. Then you save it with the Save bar, just like a change you made by hand.
Quick start
Section titled “Quick start”- Open the Custom fields page in Accentuate and pick a resource type in the scope selector, such as Product.
- Click the AI button (sparkle icon) above your list of fields.
- Pick a suggestion like Analyze my store and suggest fields, or type your own request.
- Review the Suggested changes card and click Confirm.
- Click Save in the Save bar at the top of the page.
That’s it. Your new fields are live and ready to fill in on the Editor page.
What you can use it for
Section titled “What you can use it for”| You want to… | The assistant can… |
|---|---|
| Get started quickly | Look at a sample of your catalog and suggest a ready-made set of sections and fields that fit what you sell. |
| Add a field without learning every option | Pick the right field type, key and settings from a plain-language description. |
| Keep your field list organized | Create sections, move fields between sections, merge sections that do the same job and reorder fields. |
| Improve existing fields | Rename fields, write clearer help text and add validation rules, choice lists, placeholders and other settings. |
| Check where things stand | Tell you which fields you have, what you’ve changed but not saved yet, and whether a field you deleted is really gone. |
| Learn as you go | Explain field types, compare options and help you plan your setup before you build it. |
Getting access
Section titled “Getting access”The AI Assistant is in beta, and you need to enroll your store to use it.
- Open the Custom fields page.
- Find the New AI assistant (beta) banner.
- Click Enroll.
When enrollment succeeds, you’ll see a confirmation. The AI button then appears on the Custom fields page for every resource type the assistant supports.
Supported resource types
Section titled “Supported resource types”The assistant works on the resource type selected in the scope selector at the top of the Custom fields page:
| Resource type | Supported | “Analyze my store” available |
|---|---|---|
| Product, Variant, Collection | Yes | Yes |
| Page, Blog, Article | Yes | Yes |
| Market, Location | Yes | Yes |
| Product type, Vendor | Yes | Yes |
| Order, Draft order, Customer | Yes | No. Order and customer data is never sent to the AI. |
| Shop, Global | Yes | No (these are single, store-wide records) |
| Metaobject | No | No |
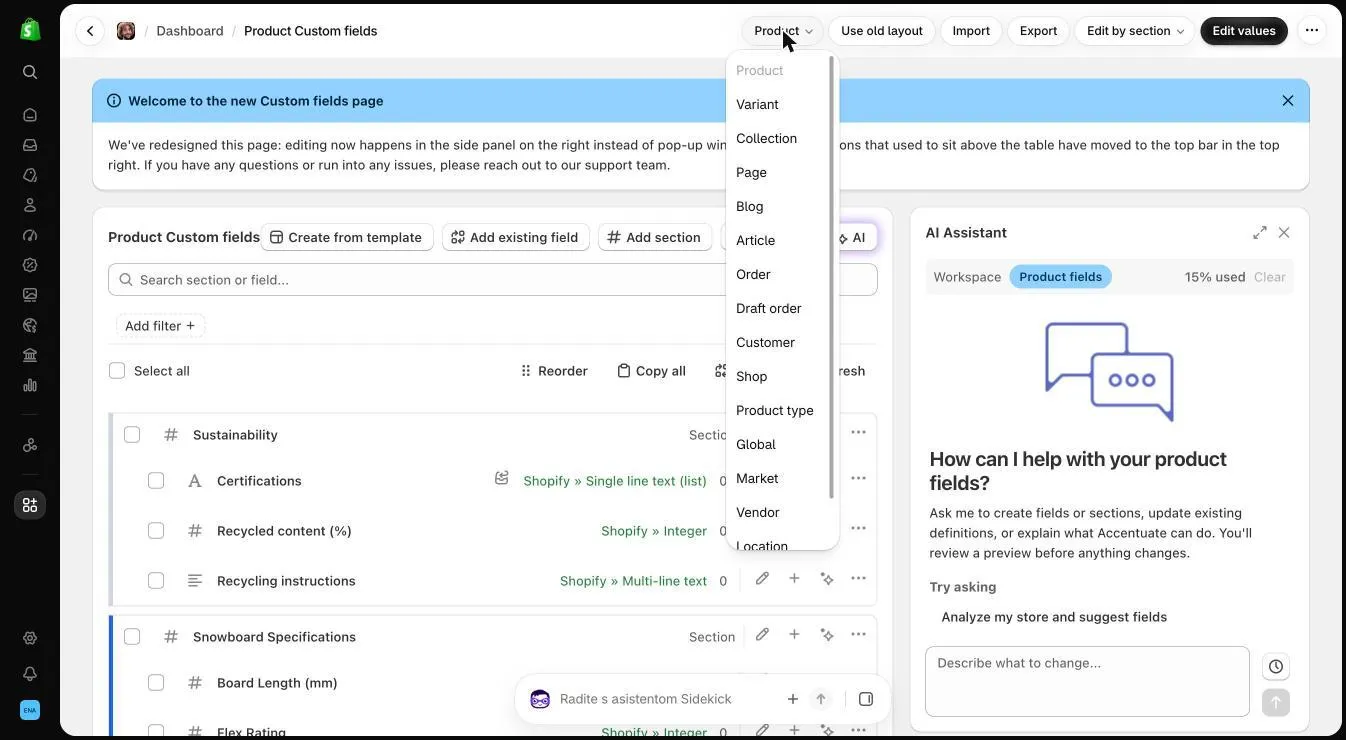
A few things vary by resource type:
- Product type, Vendor and Location use Accentuate field types only. Shopify-native field types aren’t available here.
- Global fields always use the
globalsnamespace. - On every other resource type, the assistant suggests Shopify-native field types by default, because they work best with Shopify and your theme. If you’d rather use an Accentuate field type, just ask for it.
Opening the assistant
Section titled “Opening the assistant”You can open the assistant in three ways. Each one starts a slightly different conversation.
1. For your whole list of fields: the AI button
Section titled “1. For your whole list of fields: the AI button”Click the AI button (sparkle icon) above your list of fields. The assistant opens in the side panel and can work on all fields and sections for the selected resource type.
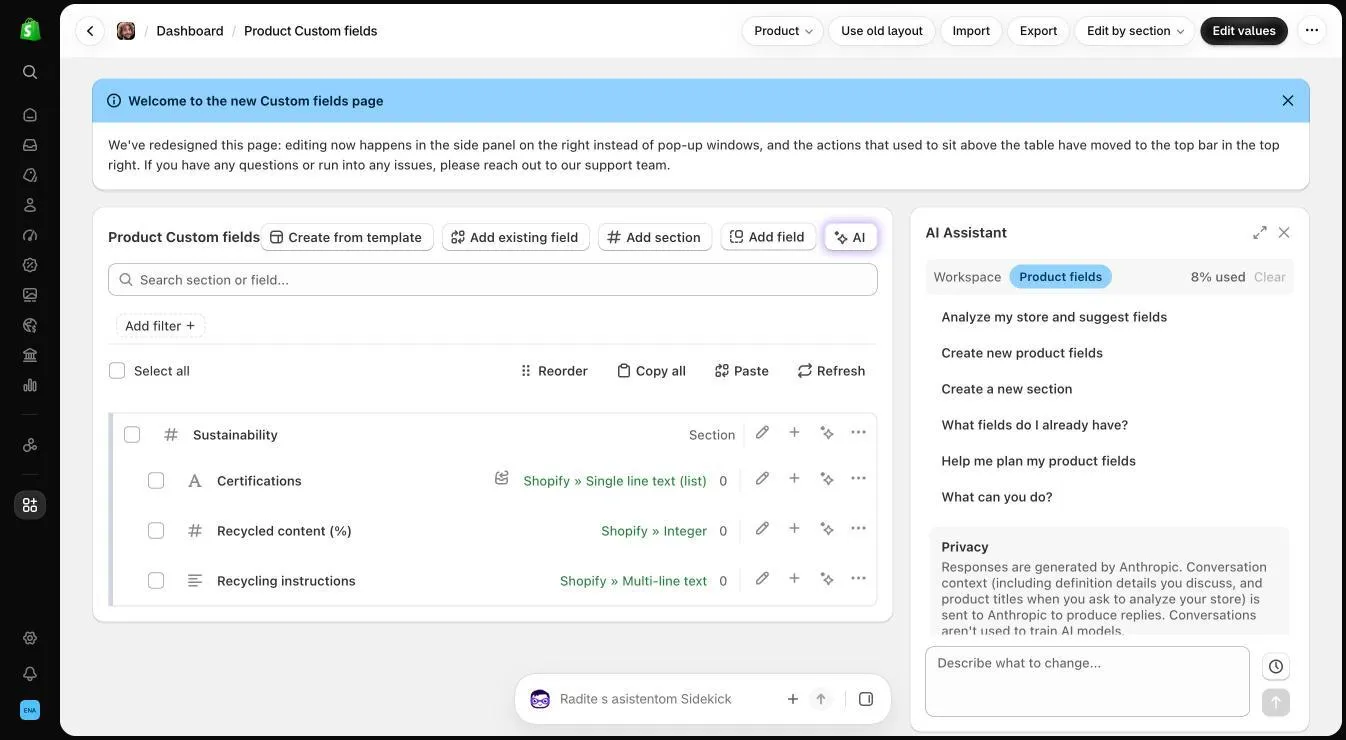
Use this when you want to:
- Create new fields or sections
- Analyze your store
- Ask what fields you already have
- Reorganize several sections at once
Suggested starting prompts:
- Analyze my store and suggest fields
- Create new product fields
- Create a new section
- What fields do I already have?
- Help me plan my product fields
- What can you do?
2. For one field or section: the sparkle icon on a row
Section titled “2. For one field or section: the sparkle icon on a row”Every field and section in your list has a sparkle icon (Ask AI about this item). Clicking it opens the assistant focused on that one item. You can then say “rename this” or “add a validation” without explaining which field you mean.
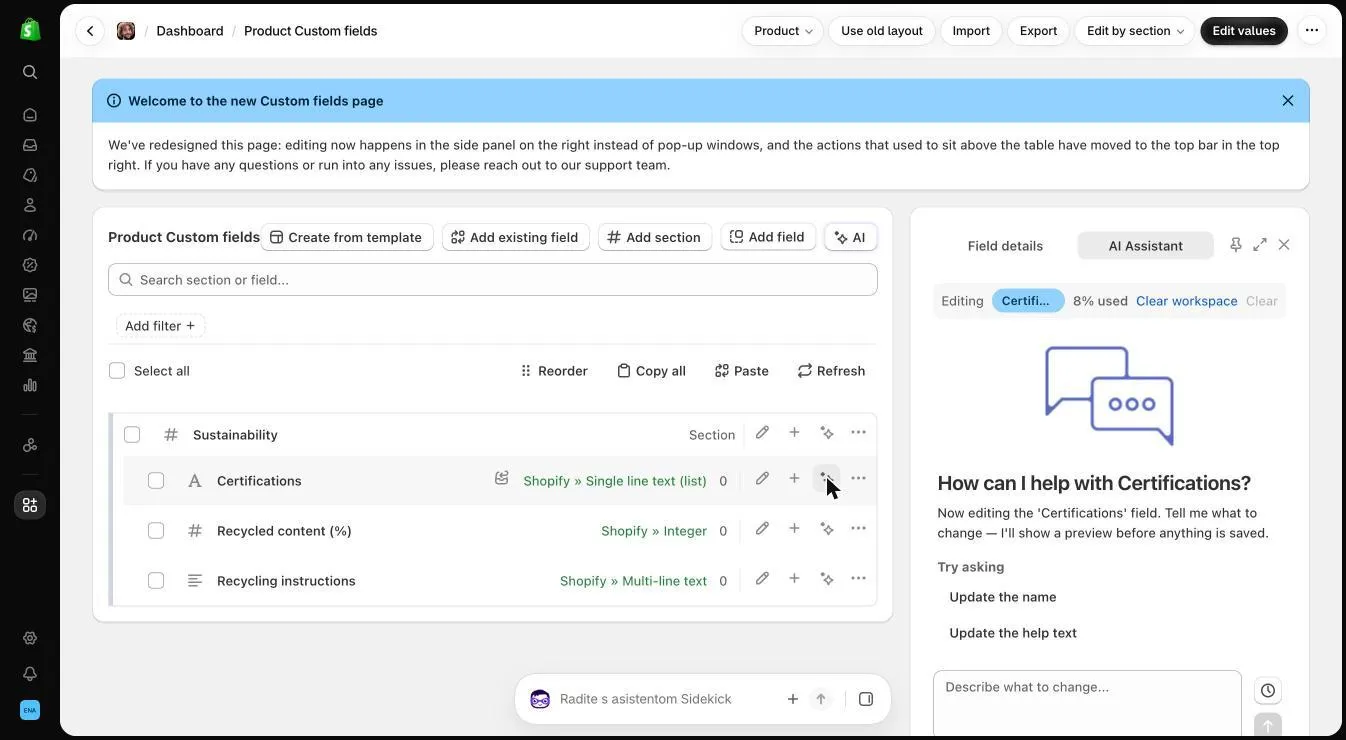
Suggested starting prompts for a field:
- Update the name
- Update the help text
- Add validation rules to this field
- Explain this field type
Suggested starting prompts for a section:
- Add a field under this section
- Rename this section
- Update the help text
- Make this section collapsible
- Change this section’s color
3. From the details panel: the AI Assistant tab
Section titled “3. From the details panel: the AI Assistant tab”When you click a field or section to see its details, the side panel shows an AI Assistant tab next to the details tab. It works the same way as the sparkle icon.
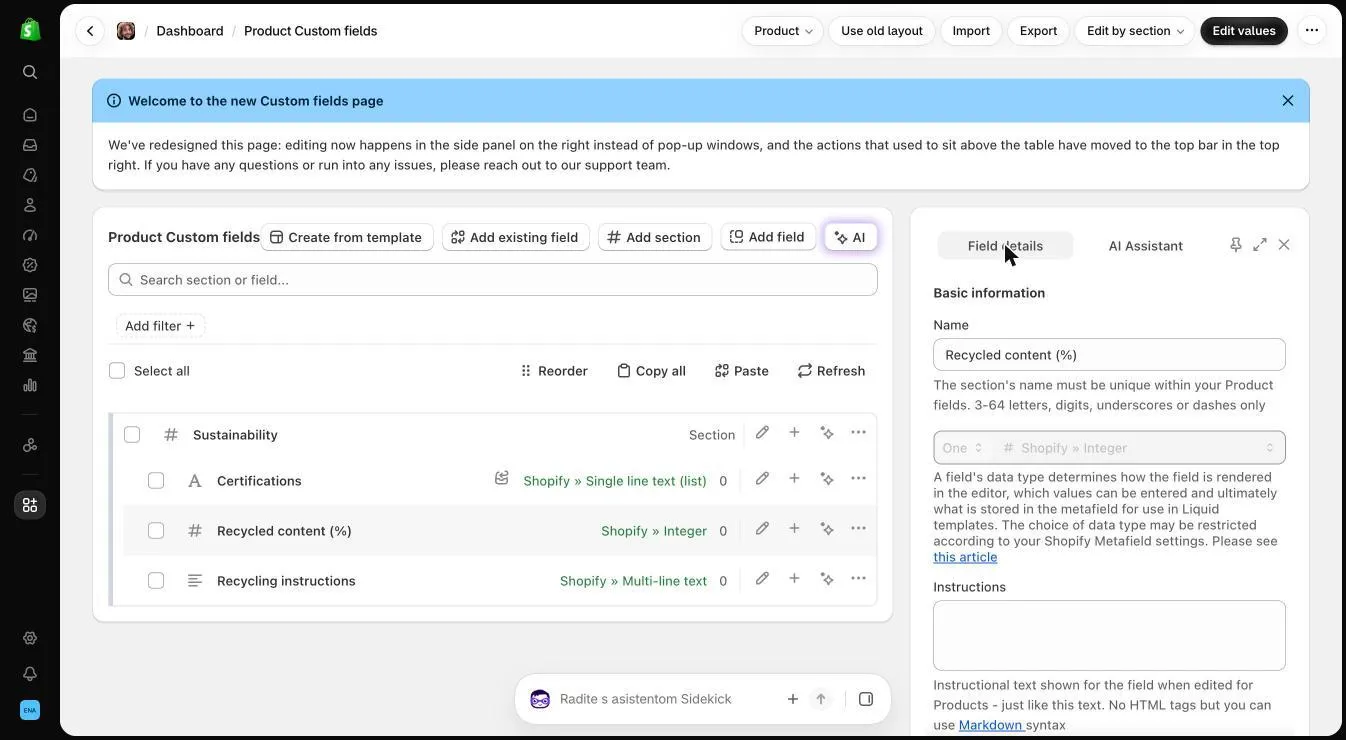
How a change gets made
Section titled “How a change gets made”Every change follows the same steps:
You describe it → The assistant asks (if needed) → You review → Confirm → Save
Step 1: Describe what you want
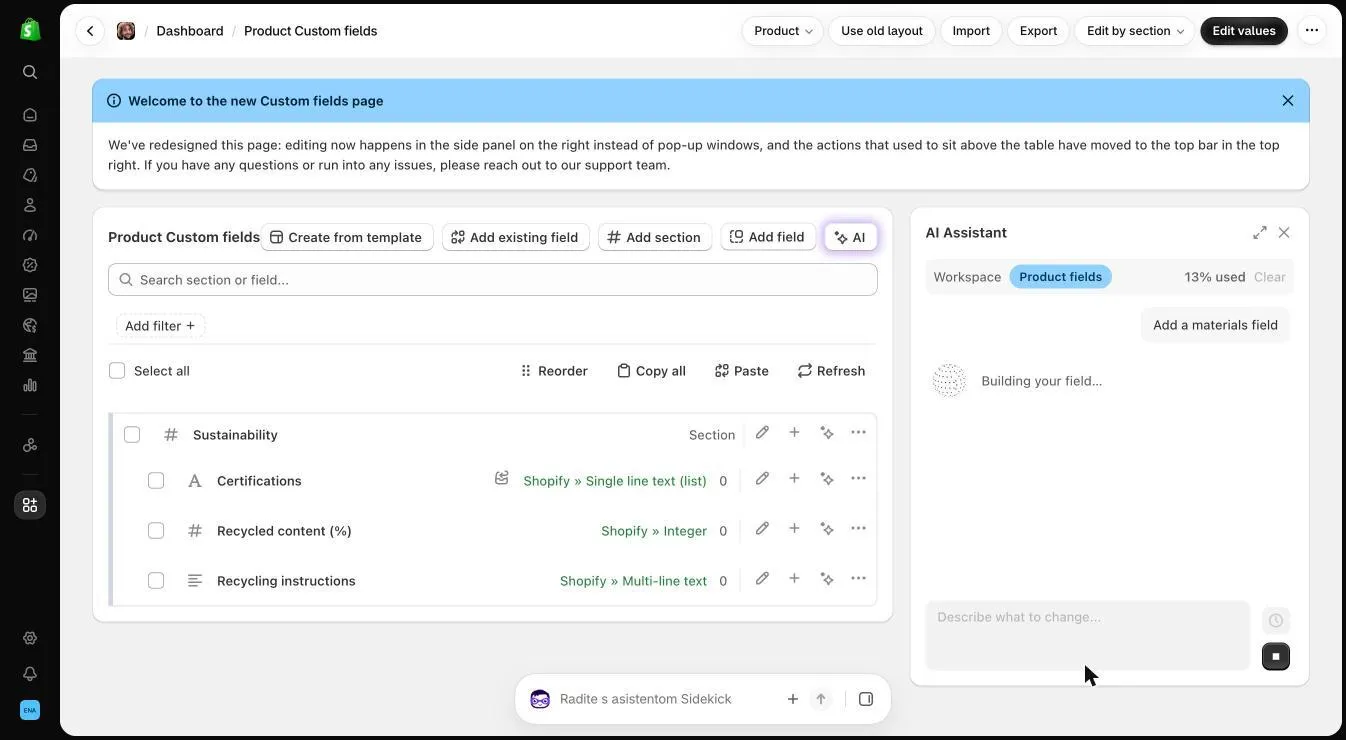
Section titled “Step 1: Describe what you want”Type your request in the message box and press Send. While the assistant works, you’ll see short progress messages like “Looking at your fields” or “Building your field”. To stop a reply partway through, click Stop generating.
Step 2: Answer any questions
Section titled “Step 2: Answer any questions”If your request leaves something important open, the assistant shows an Additional questions card with a few quick choices. For example, it might ask whether a field should hold one value or several, or which section it belongs in.
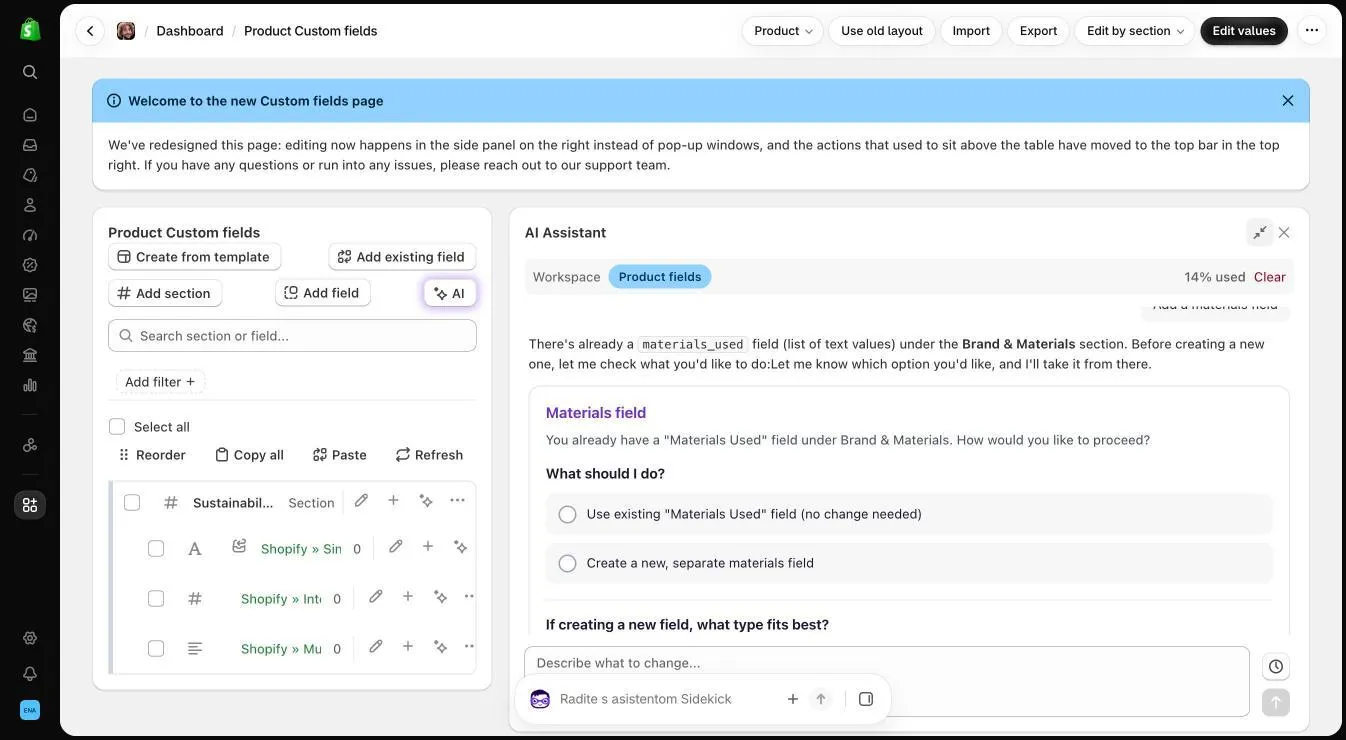
- Pick the options that fit. Some questions allow more than one answer.
- If none of the options fit, choose Other and type your own answer.
- Click More info to see why the assistant is asking.
- Click Generate preview when you’re done.
You can change any of these choices again before you confirm.
Step 3: Review the suggested changes
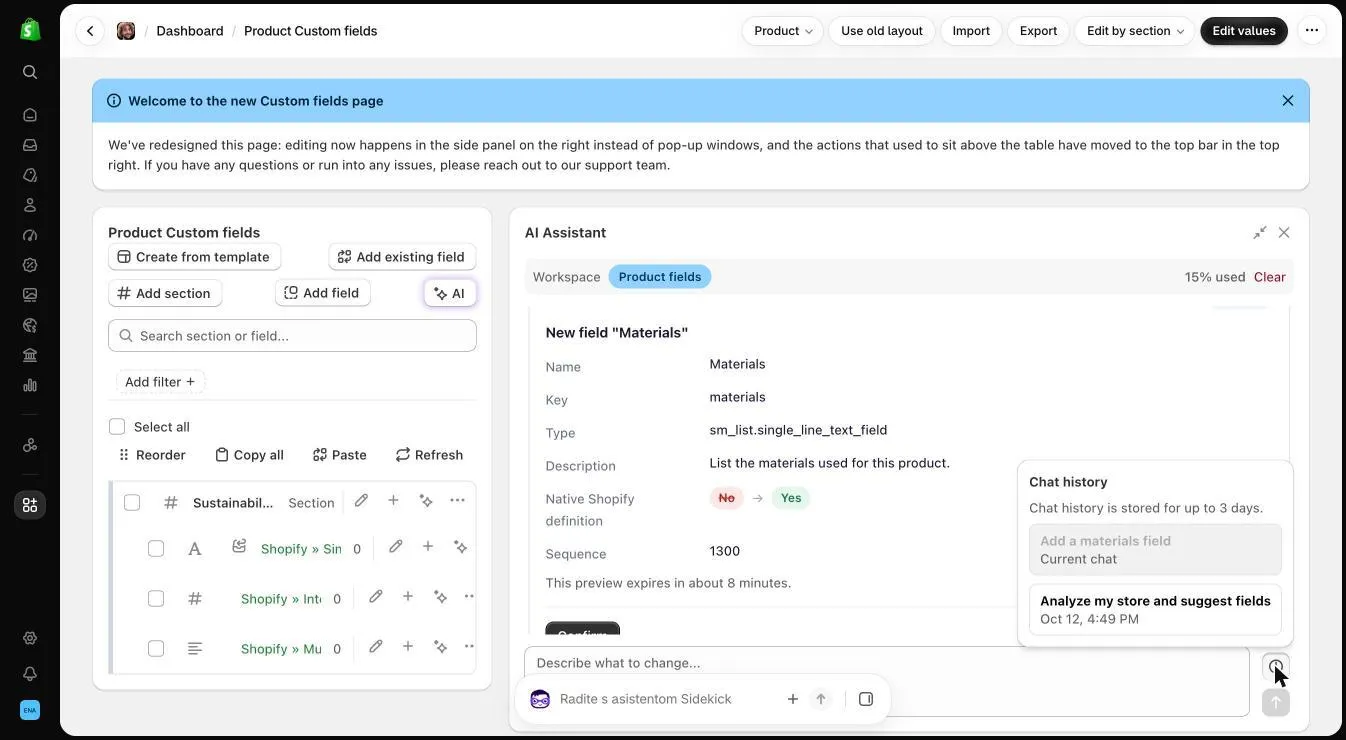
Section titled “Step 3: Review the suggested changes”The assistant shows a Suggested changes card. It lists every field and section it would create or change, with the before and after values for each setting. Card titles tell you what kind of change it is: New field, New section, Changes to “…” or Name change in “…”.
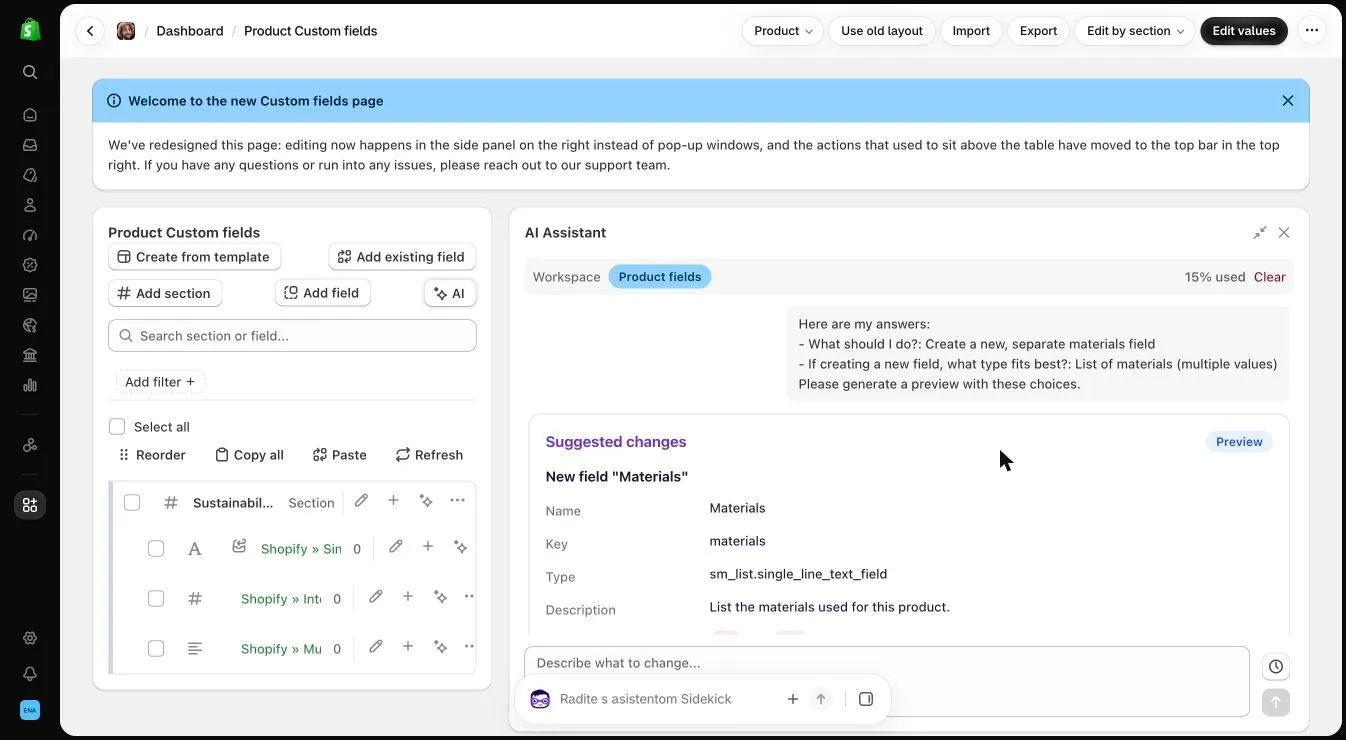
Read the card carefully. It shows exactly what will happen.
Step 4: Confirm or discard
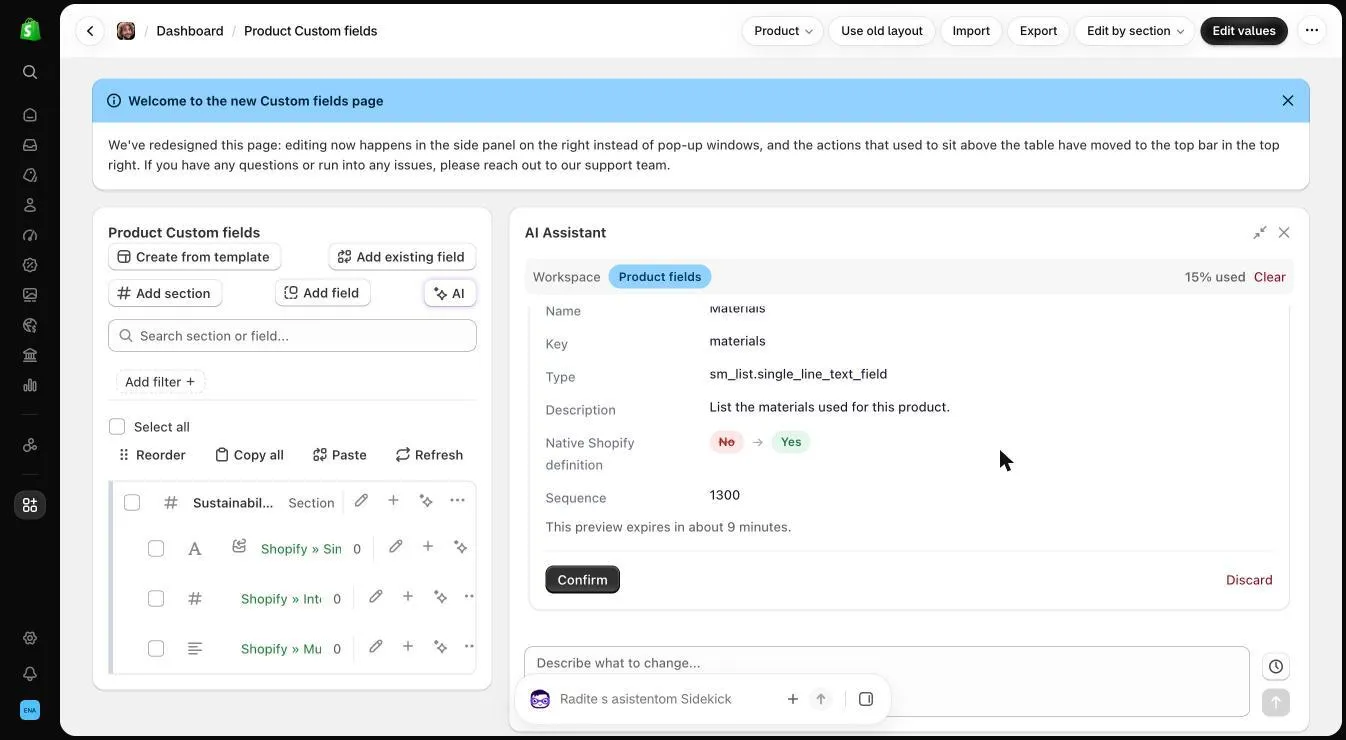
Section titled “Step 4: Confirm or discard”- Confirm adds the changes to your list of fields as unsaved changes. You’ll see them in the list right away, marked as unsaved, just like changes you make by hand.
- Discard throws the suggestion away. Nothing changes.
- Want something slightly different? Don’t confirm. Send a follow-up message such as “Make it required” or “Call it Fabric instead”, and the assistant will create a new preview.
Step 5: Save
Section titled “Step 5: Save”Click Save in the Save bar at the top of the page. This is the step that writes the changes to your store. Until you save, you can undo confirmed changes the same way you undo any other unsaved change.
Card statuses
Section titled “Card statuses”| Status | What it means |
|---|---|
| Preview | Waiting for you to Confirm or Discard. |
| Applied | You confirmed it and the changes are in your list. Save to make them live. |
| Discarded | You discarded it. Nothing changed. |
| Expired | Previews expire after about 10 minutes. Ask the assistant to create it again. |
| Deleted | A field in the preview was deleted in the meantime. Ask the assistant to create it again. |
The assistant keeps one open preview at a time. If you ask for something new before you confirm, the new preview replaces the old one.
Use cases with example prompts
Section titled “Use cases with example prompts”Set up your fields from scratch
Section titled “Set up your fields from scratch”Best for: new Accentuate users, or anyone adding a new product line.
Open the assistant from the AI button and ask:
Analyze my store and suggest fields
The assistant looks at a sample of your catalog, such as product titles, product types, vendors and tags. It then suggests 1–3 sections with about 4–10 fields, ready to confirm. It skips any fields you already have. It also writes field names and help text in the main language of your catalog.
You can add details to steer the suggestion:
Analyze my store and suggest fields for my furniture. Focus on dimensions, materials and care.
We sell skincare. Suggest fields for ingredients, skin type and how to use it.
Create a specific field
Section titled “Create a specific field”Be as specific as you like. The assistant fills in the rest with sensible defaults.
Add a “Fabric” field with choices: Cotton, Linen, Wool, Silk.
Create a required number field for weight in grams, between 1 and 50,000.
Add an image field for a size chart under the “Sizing” section.
I need a field for a product video and another for a downloadable PDF manual.
Organize with sections
Section titled “Organize with sections”Create a section called “Specifications” and move Width, Height and Depth into it.
I have two sections that both look like “Care”. Merge them into one.
Make the “Shipping info” section collapsible and color it light blue.
Only show the “Apparel details” section for products of type T-Shirt and Hoodie.
Improve existing fields
Section titled “Improve existing fields”Start from the field’s sparkle icon so the assistant knows which field you mean:
Rename this to “Country of origin”.
Write clearer help text for my team. Explain they should use the full country name.
Only allow values between 0 and 100.
Add a placeholder that says “e.g. Machine wash cold”.
Check where things stand
Section titled “Check where things stand”What fields do I already have?
What have I changed but not saved yet?
I just deleted “Old SKU”. Is it gone?
Which fields aren’t in any section?
The assistant checks these against your current list, including unsaved changes. It doesn’t rely on what was said earlier in the chat.
Learn and plan
Section titled “Learn and plan”What’s the difference between a single-line text field and a multi-line text field?
Should I use a choice list or tags for product colors?
Help me plan fields for a store that sells bikes and bike parts.
What can you do?
You can plan as long as you like. The assistant won’t create a preview until you ask for one. You can also tell it “don’t create anything yet”.
Tips for better results
Section titled “Tips for better results”- Start from the right place. Use the AI button for new fields and store-wide changes. Use a row’s sparkle icon to change one existing field.
- Check the resource type first. The assistant only works on the resource type selected in the scope selector.
- Say what the field is for, not just its name. “A field for how many days a product takes to ship, used on the product page” gives a better result than “shipping days”.
- Give exact values when you know them. Choice lists, minimum and maximum values, colors (as a hex code such as
#1F6FEB) and section names all help the assistant get it right the first time. - Refine with follow-up messages. If the preview is almost right, say what to change. You don’t need to start over.
- Use exact names when several fields look alike. If two fields have similar names, the assistant asks which one you mean.
- Tell it your brand color. The assistant can’t see your brand colors. “Our brand color” gets a reasonable default, so give the hex code if you want an exact match.
- Read the card before you confirm. The Suggested changes card is the source of truth. If something on it isn’t what you meant, send a follow-up message instead of confirming.
- Write in your own language. The assistant replies in the language you write in. Field keys always stay in English (for example
care_instructions), because themes and integrations depend on them.
What the assistant can’t do (yet)
Section titled “What the assistant can’t do (yet)”These limits are intentional. They keep your store data and theme safe.
| It can’t… | Instead… |
|---|---|
| Delete fields, sections or values | Delete them from the field list as usual. The assistant can then confirm they’re gone. |
| Change a field’s key after it’s been saved | Rename the field’s display name instead. The key stays the same so your theme keeps working. |
| Change the type of a field that’s already been saved | Create a new field with the type you need. You can change the type of a field you’ve confirmed but not saved yet. |
| Work with metaobjects | Set up metaobject definitions by hand. |
| Fill in or suggest field values for your products | Enter values on the Editor page, or use bulk import. |
| Write Liquid code or change your theme | Use Accentuate’s display options or your theme editor. |
| Run bulk imports or exports | Use Accentuate’s import and export tools. |
| Fix a mismatch between Accentuate and Shopify field types | Use Fix definition on the Custom fields page. |
| Answer general Shopify questions unrelated to custom fields | Contact Accentuate support through the in-app chat. |
| Work on a resource type other than the one selected | Switch the scope selector, then ask again. |
Chat history and starting over
Section titled “Chat history and starting over”- Your conversation is kept while you work, so you can close the panel and come back later.
- Chat history (the clock icon next to the message box) lists your recent conversations for the current resource type. Click one to reopen it. Chat history is kept for up to 3 days.
- Clear starts a new, empty chat. Start a new chat when you switch to an unrelated task. The assistant does its best work when a conversation stays on one topic.
- Clear workspace leaves a focused field or section and returns to the whole-list view.
Monthly usage allowance
Section titled “Monthly usage allowance”Each store gets a monthly AI allowance. A longer conversation or a larger store analysis uses more of it than a quick rename.
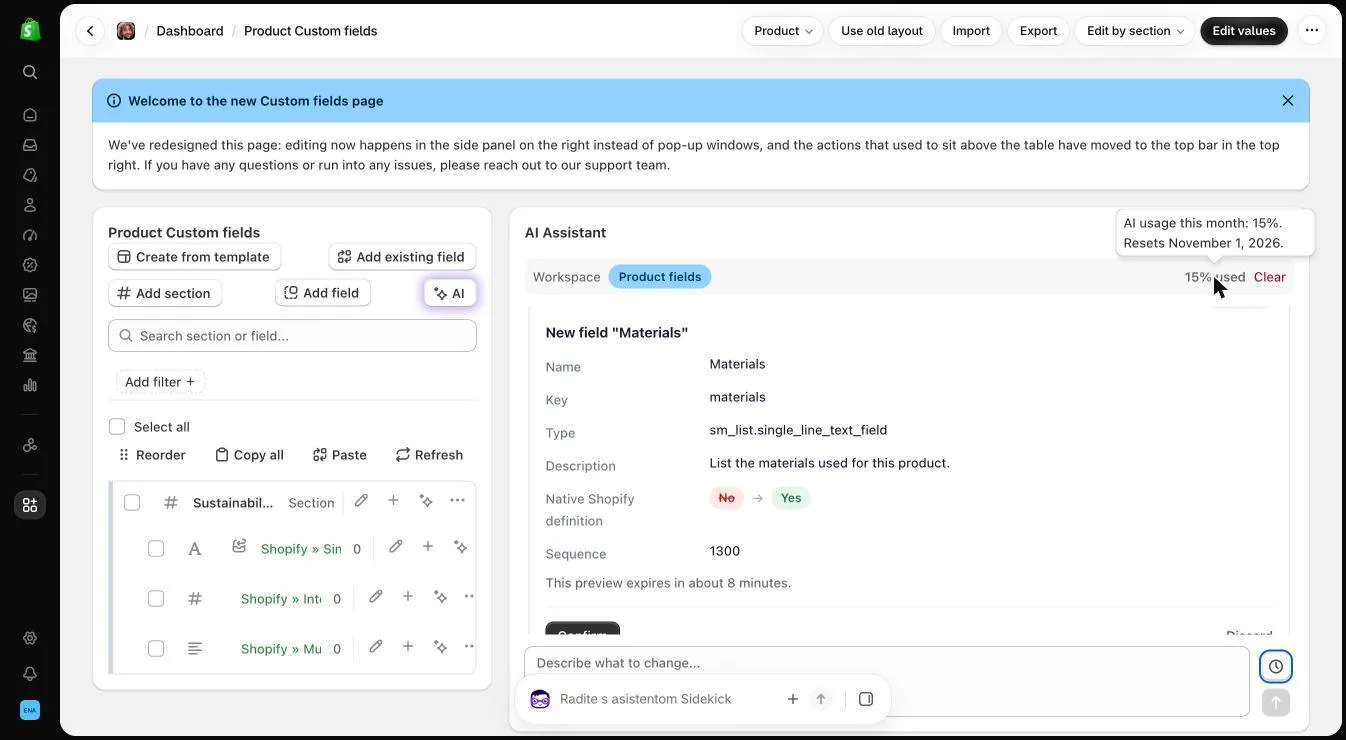
- In the chat header, a small badge shows how much you’ve used this month, for example 42% used. Hover over it to see when it resets.
- At 90%, a warning banner appears above the message box.
- At 100%, the assistant pauses until your allowance resets. A banner shows the reset date.
- The allowance resets on the 1st of every month.
- You can also check your usage under Settings, in the AI Assistant usage section.
During the beta, stores get promotional extra capacity while the feature rolls out.
Make your allowance go further:
- Start a new chat for each separate task instead of one very long conversation.
- Put everything you need into one message. For example: “Create fields for material, weight and care, all in a ‘Details’ section”.
- Use a row’s sparkle icon for small edits to one field.
Privacy and your data
Section titled “Privacy and your data”- Who provides the AI: Anthropic generates the assistant’s replies.
- What’s shared: your messages, the details of the fields and sections you’re discussing, and, when you ask it to analyze your store, a sample of your catalog. For products, that means titles, handles, product types, vendors and tags. For other resource types, it’s mostly titles and handles.
- What’s never shared: order and customer data. For these resource types the assistant never looks at your records, so “Analyze my store” isn’t offered there.
- Training: your conversations aren’t used to train AI models.
- Changes to your store: the assistant never saves anything by itself. Every change needs your Confirm and Save.
Troubleshooting and FAQ
Section titled “Troubleshooting and FAQ”I don’t see the AI button
Section titled “I don’t see the AI button”Check that your store is enrolled (look for the New AI assistant (beta) banner on the Custom fields page) and that a supported resource type is selected. The assistant isn’t available for metaobjects.
“AI Assistant is not available for this shop yet.”
Section titled ““AI Assistant is not available for this shop yet.””Your store isn’t enrolled. Click Enroll on the beta banner, or contact support.
“This preview expired. Ask me to regenerate it.”
Section titled ““This preview expired. Ask me to regenerate it.””Previews expire after about 10 minutes. Ask “Show that preview again” and confirm the new card.
“This preview was replaced by a newer one.”
Section titled ““This preview was replaced by a newer one.””Only one preview can be open at a time. Use the newest card, or ask the assistant to create the earlier one again.
“This preview belongs to a different scope.”
Section titled ““This preview belongs to a different scope.””You changed the resource type after the preview was created. Switch back, or ask again on the current resource type.
“Nothing new to stage — definitions already match.”
Section titled ““Nothing new to stage — definitions already match.””Your fields already look the way you asked, so there’s nothing to change.
“Another AI request is already in progress.”
Section titled ““Another AI request is already in progress.””The assistant handles one request at a time per store. Wait for the current reply to finish, or click Stop generating.
“You’re currently editing … To create a new field or section, click Clear workspace.”
Section titled ““You’re currently editing … To create a new field or section, click Clear workspace.””You’re in a single-field conversation. Click Clear workspace and ask again.
I clicked Confirm, but the change isn’t live in my store
Section titled “I clicked Confirm, but the change isn’t live in my store”Confirm adds the change to your list as unsaved. Click Save in the Save bar at the top of the page to make it live.
The assistant picked a different field type than I expected
Section titled “The assistant picked a different field type than I expected”On most resource types, it suggests Shopify-native types by default. Tell it what you want, for example “Use an Accentuate text field instead”, and it will update the preview.
Can I undo something I confirmed?
Section titled “Can I undo something I confirmed?”Yes, as long as you haven’t saved. Confirmed changes are unsaved changes in your list, so you can undo them like any other edit. After you save, ask the assistant to change the field back, or edit it by hand.
Is there a limit on how much it creates at once?
Section titled “Is there a limit on how much it creates at once?”One preview can include up to 15 fields and sections. For larger setups, work one section at a time.
Something else went wrong
Section titled “Something else went wrong”Try sending the message again. If the problem continues, start a new chat with Clear, or contact Accentuate support.
Share your feedback
Section titled “Share your feedback”The AI Assistant is in beta, and what you tell us decides what it learns next. Send your ideas and issues to Accentuate support through the in-app chat.